
*This post may contain affiliate links for which I earn commissions.*
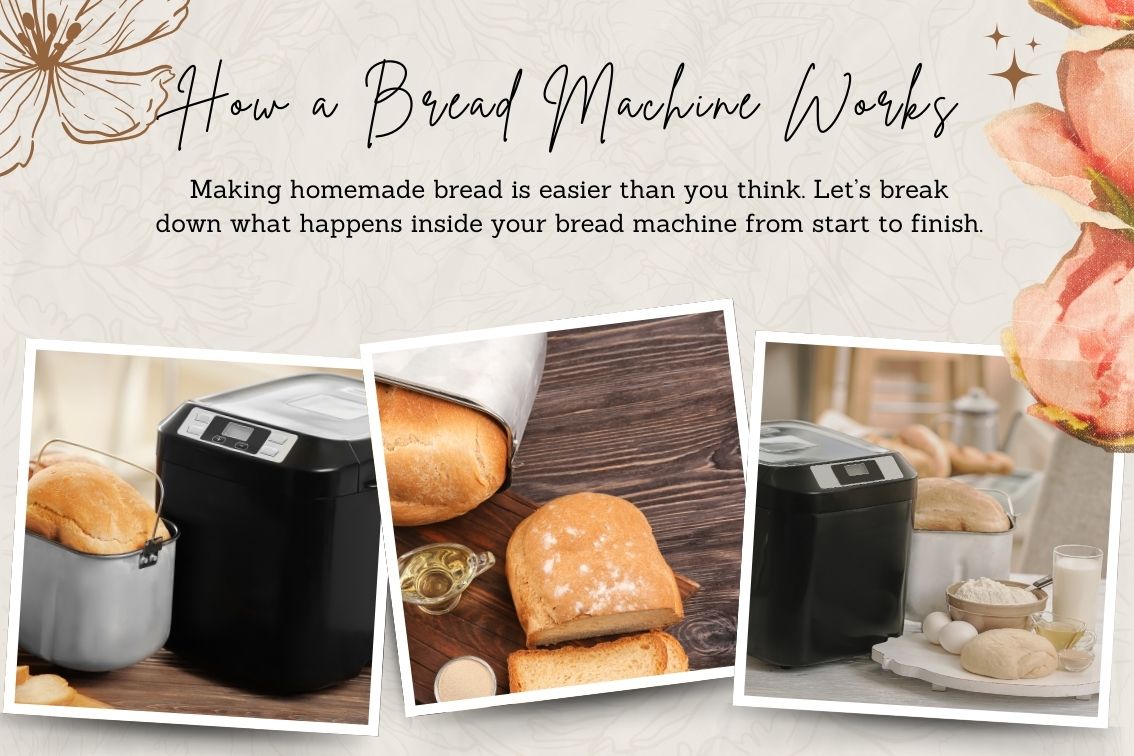
There’s nothing quite like the smell of fresh-baked bread wafting through your kitchen — warm, comforting, and just a little bit magical. But what if you could enjoy homemade bread without all the mixing, kneading, and guesswork?
Bread machines make it incredibly easy to create delicious loaves with minimal effort. In this guide, we’ll walk you through how these machines work, what to expect from each cycle, and why they’ve become a favorite in kitchens around the world.
If you’ve ever wondered, “What actually happens inside that little machine?” — you’re in the right place.
Overview of Bread Machine Parts
Before we jump into how a bread machine works, it helps to know what the main parts are and what they do. Most machines, no matter the brand, have a few basic pieces that all work together to take your ingredients from a messy mix to a golden loaf of bread.
Bread Pan
This is where everything happens. You’ll add your ingredients here, and the bread will mix, rise, and bake all in this one pan. Most are nonstick and pop right out for easy cleaning. I never spray mine. It comes out clean every time.
Kneading Paddle (or Two)
This little piece at the bottom of the pan does the heavy lifting. It stirs and kneads the dough during the first part of the cycle, then stops once it’s time to bake. Some machines have two paddles, especially if they make horizontal loaves.
Keep an eye on this when you wash the dishes, it’s small and can get stuck in a kitchen drawer by a loved one. My son stuck mine in a drawer and I had to have him tell me where he put it before I could make my next loaf of bread.
Heating Element
Tucked inside the base of the machine, this heats the pan during the baking stage. You won’t see much of it, but it’s what gives your bread that warm, even bake.
Control Panel
This is where you choose your settings—like what kind of bread you’re making, how dark you want the crust, and sometimes even the loaf size. It’s kind of like the command center of your bread machine.
Lid (with or without a Window)
The lid holds in the heat while the bread bakes. Some lids have a little window so you can peek in without lifting it and letting the heat escape.
Fruit and Nut Dispenser (Optional)
Some machines come with a handy compartment that drops in raisins, nuts, or seeds at just the right time. If your machine doesn’t have one, no worries—you can always add those by hand when the machine beeps.
How a Bread Machine Works – Step by Step
Once you add your ingredients and press start, your bread machine takes over. It runs through a series of steps all on its own—no babysitting needed. Here’s a peek at what’s going on behind the scenes.
Step 1: Mixing
First up, the paddle starts spinning to mix your ingredients into a rough dough. If you open the lid during this stage (which you can do early on), you’ll usually see flour stuck to the sides and a lumpy ball forming. Totally normal.
Step 2: Kneading
After everything’s combined, the machine kicks into kneading mode. This stage lasts about 10 to 20 minutes, depending on your settings. It works the dough just like you would by hand, building up the gluten and giving it that good stretchy texture. I love this!
Step 3: First Rise (Proofing)
Once the kneading stops, the dough gets to rest and rise. The machine gently warms the pan to help the yeast do its job. You won’t hear anything happening here, but it’s working—slow and steady. I use the dough setting most of the time, when it get’s done with the first rise, then I put the dough in a bread pan for the second rise before I put it in the over to bake.
Step 4: Punch Down & Second Rise
In some settings, the machine will stir the dough again briefly to punch it down, then let it rise a second time. This helps the bread develop a better texture and shape.
Step 5: Baking
After all that rising, it’s time to bake. The heating element kicks in and turns that puffy dough into a golden-brown loaf. Your kitchen is going to smell amazing.
Step 6: Cooling
When the bread is done, the machine usually beeps. Some models will keep the bread warm for up to an hour, but it’s best to take it out pretty quickly so the crust doesn’t get too soft from the steam.
Why People Love Bread Machines
Once you’ve used a bread machine a few times, it’s easy to see why they have such a loyal fan base. They take something that seems complicated and turn it into a simple, almost effortless routine.
For starters, they save time. You just toss in your ingredients, press a button, and walk away. No kneading, no rising in a warm corner of the kitchen, no worrying about timing. And let’s be honest—fresh bread without standing over it all afternoon? Yes, please.
They’re also super consistent. Once you find a recipe you love, your bread machine will make that same loaf over and over again without surprises. And because you’re making it yourself, you know exactly what’s going into it—no preservatives, no fillers, just real ingredients.
Oh, and the smell? That cozy, warm, “something’s baking” scent that fills your kitchen? It’s reason enough to use your machine at least once a week.
What You Can Make in a Bread Machine (Besides Bread)
Even though it’s called a bread machine, it can do a lot more than just your basic loaf. Once you get the hang of it, you’ll probably start experimenting—and that’s when things get fun.
Most machines have a dough setting, my favorite setting, which means you can make homemade pizza dough, dinner rolls, cinnamon rolls, or even pretzels. The machine does all the mixing and kneading for you, and then you shape it, bake it in the oven, and enjoy.
Some models go even further. You can make jam, cake, and even things like yogurt or rice pudding, depending on the settings. If you’ve got a sweet tooth or like trying new recipes, those extra features can be a fun bonus.
And if you’re gluten-free or have food allergies, many machines now have a special setting just for that. You can finally enjoy bread that fits your diet, without the high price tag of store-bought loaves.
So yes, it’s a bread machine—but really, it’s a little kitchen helper that opens the door to all kinds of homemade goodness.
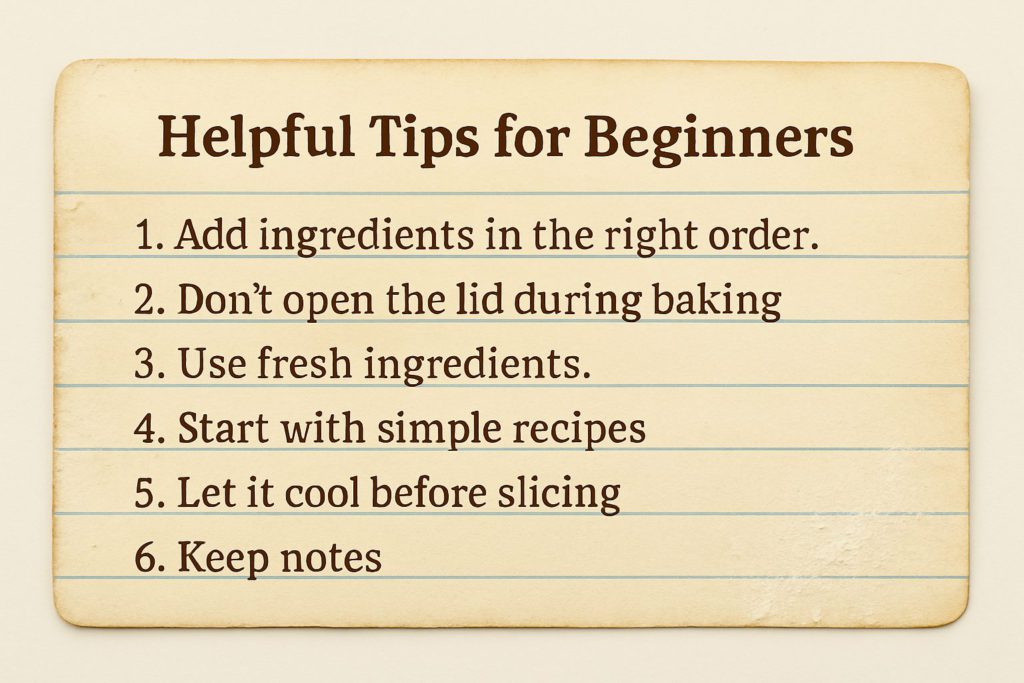
Helpful Tips for Beginners
Getting started with a bread machine is pretty simple, but there are a few little tricks that can help you avoid some common bumps in the road. Here are a few tips that’ll make your first few loaves a whole lot smoother.
1. Add ingredients in the right order.
Most machines recommend adding liquids first, then dry ingredients, and yeast last (right on top). This keeps the yeast from activating too early, especially if you’re using a delay timer.
2. Don’t open the lid during baking.
It’s tempting to peek, but once the baking starts, keep that lid shut. Opening it can mess with the temperature and cause your bread to collapse.
3. Use fresh ingredients.
Old yeast can be sneaky—it looks fine but doesn’t rise like it should. Always check expiration dates on your yeast and flour for best results.
4. Start with simple recipes.
Stick to basic white or whole wheat bread at first. Once you’re comfortable with how your machine works, then branch out into sweeter or more complex recipes.
5. Let it cool before slicing.
As hard as it is to wait, letting your bread cool for at least 15–20 minutes helps it firm up and slice better. Cutting it too soon can make it gummy inside.
6. Keep notes.
Every machine is a little different. If a loaf turns out especially great (or not so great), jot down what you did—especially if you tweak ingredients or settings.
7. Lay out ingredients to room temperature.
I read on a blog post someplace that when this person cooks any bread that’s going to rise she always lays out the ingredients to get them room temperature. For me, that means I get out my yeast and egg. I just crack the egg and put it in a little bowl and measure out my bread making yeast in a bowl. Since I make all my bread in the morning. I’ll lay out my ingredients before I eat breakfast, then when I’m done everything is room temperature. It really makes a difference in my bread making.
What’s Next?
Now that you know how a bread machine works, you’re already ahead of the game. Understanding the process makes it easier to troubleshoot recipes, try new settings, and get great results every time.
If you’re just getting started, keep things simple at first. Try out a basic loaf, see how your machine handles it, and make notes as you go. Once you’re feeling confident, there’s a whole world of doughs, flavors, and techniques to explore.
Need help picking the right bread machine? Want to avoid beginner mistakes? Be sure to check out the rest of the site — I’ve got plenty of tips, guides, and honest reviews to help you make the perfect loaf at home.
Happy baking — and don’t be surprised if your first loaf disappears before it even cools.